I think this is an awesome project, although it is a little late in the season for it. As you may have figured out by now, I love plants. My spring days, or at least weekends, are usually spent gardening. Up until now, I was using a ratty old metal/MDF desk as a potting table... ew. I don't think I took a picture of it, but even if I did I would be too embarrassed to post it on the interwebs. It really wasn't totally functional for many reasons, beside being hard on the eyes. Ready to see the replacement??

Now THAT's ready for some gardening!
So, let's break down how this beauty came to be:
Step 1: Picking out the pieces
The first thing I picked up for this project was the brackets holding the top shelf. I didn't know what I was going to use them for, but found them at the Lancaster Habitat for Humanity Restore, and knew I would be able to make use of them somewhere.
Here's a close up:

Too cool to pass up, right?
I had some banister spindles laying around that I intended on making into legs for another project that never came to be. So, I knew I wanted to use those as the table legs.
Next, came the door. The Restore usually has a great selection of doors. Mine was an interior door, which I bought because of the price difference between that and an exterior door. In hindsight, an exterior door would have made a few things easier (I'll explain below), but since I plan to store this under our second-story deck, I don't think it will be exposed to the elements too much. I picked the widest door I could find (36") so that I could have as much space as possible on my table.
I'll try to summarize a parts list below, but those were the major purchases for me to get started.
Step 2: Paint the door
This is what the door looked like when I brought it home:

I wanted the door to have an aged, distressed look, so I took some dark blue/green paint that I had laying around, and used a dry paint brush to add some color. By dry brush, I mean that I only dipped the very end of the brush in the paint, wiped most of it off on the lip of the can, and then painted with as few strokes as possible. Finally, I white-washed the door to lighten things up a bit. To white-wash, I use a half white paint, half water mixture which I apply with a brush and then wipe off after a few minutes with a rag. After all of that, the door looked like this:

Step 3: Build the frame for the table
Ok, this is where we need to pause to have the interior door discussion. My original plan was to make the table surface the same width as the door. This meant that my frame needed to be slightly smaller, so that the top could overhang the frame. The problem with interior doors is that they are generally hollow core. This means that the door is entirely hollow, except for the outside. Like this:
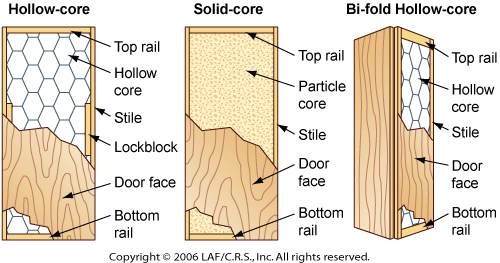
http://www.asktooltalk.com/articles/construction/doors/doors_interior.php
So, for me to be able to screw this frame into anything but air, I needed to screw it in at the edges of the door. Which meant the top was going to be either the same width as the frame, or wider than the door. Not a big deal, but something you probably want to know, in case you are picky like me. So, I built a square out of some scrap 1X3 that I had laying around, 36" (width of door) by 22".

Step 4: Attach frame and legs
Next, the frame needs to be attached to the door. I found that laying the door down was the easiest way to do this. I made sure the frame was sitting at the approximate height that I wanted my top (in between the two large panels on a standard paneled door), and glued and screwed the frame to the door (screws at an angle to make sure I hit the solid part of the door). Next, I measured the distance from the top of my frame to the bottom of the door, and transferred that measurement to my legs and cut them to length. Finally, I added some extra bracing like so:

Then i added a little bit more bracing to the frame to make it nice and sturdy:

Nice use of some scrap, if I do say so.
Finally, before I put this baby upright again, I attached the shelf brackets to the very edges of the door (again, where the hollow core door is solid).
Step 5: Add some trim to the frame.
This thing was starting to actually look like a bench! The only problem was that the frame wasn't really exciting too look at. Is this a big deal? No, but since I had some trim laying around, I thought I would add a little bit of 'weight' to the table. This was tall baseboard trim, by the way, but anything that is tall enough to cover the 1x3 frame could work. Attach the trim with glue and trim screws or trim nails. So here it is:

Notice that the trim actually goes all the way back to the back of the door. I thought this was actually nice to tie the table to the door. So, here, I suggest cutting the front panel first by holding it up to the frame, marking the back of the trim at the edges of the table, then cutting a 45 deg. angle. Once you have that trim on, cut the 45 on one of the sides, hold it up to the frame, make sure your corner looks good, then mark the length on the back side and cut. Repeat on the other side. Avoids measuring tapes that way. :)
Anyway, the next step is to fill holes/seams- like the nice one on the front of the trim? A dumb mistake on my part meant that I had to join two pieces of trim together... on the front of my bench. Ugh. If you find yourself in this predicament, I suggest cutting the trim at a 45 deg. angle; it is more forgiving if your cuts aren't dead on, and will be less noticeable than a butt-joint once you paint.
Speaking of paint, go ahead and paint the frame and legs your favorite color. I went with the blue/green from the door.
Step 6: Add your table top and shelf
Then, you can add your table top and shelf. i used 1x6's for the top, which worked out well to have space between the boards (for water to drain) and overhang on the front. I used a 1x10 for the shelf because it fit the bracket well. Again, fill your screw holes (I used trim screws here too) and sand smooth. Here she is so far:

Step 7: Add your hardware
This part was a little more complicated than I wanted it to be. My hardware was made up of cabinet pulls and knobs designed to be screwed directly into drywall. Both came with short screws that, long story short, just weren't going to work for installing them on a door. After staring at the bench for a few minutes, trying to just make these knobs attach themselves, I consulted with my hubby and we headed to the hardware store for longer screws.
If you find yourself with the same predicament, let me suggest the following:
1. Measure the thickness of the door/frame you are attaching the knob to.
2. Take the knobs with you to the hardware store to make sure the new screws will work.
3. For me, 2" no. 8 machine screws worked perfectly for both knobs (maybe that's a standard thing?). I also bought some washers to help space the gap if the screw turned out to be a little too long.
To install your knobs, drill holes through the door to match the screw size, then thread the screw through the door. If you are unlucky and a little too forceful with the drill this happens:

oops.
Step 8: Sand and paint your table surface
Once your wood filler is dry, sand the table top. My "mouse" sander did the trick (and after the drill incident, I figured I had better stay away from the serious sanders...)

I decided to go for a white-wash again for the table top, so once again mixed up a half white paint, half water mixture, but unlike the door, i did not wipe it off. In fact, I put on two coats. So, here it is, ready to go!

And just look at it when you load it up, and photograph it with a real camera (this one is true to color):


Phew! Fun, right? What do you think? Anything I left out? Feel free to comment with any thought or questions!
The cost break-down, at least for me:
Door $12 (Restore!)
Knobs $4.50 (Restore!)
and $20 (Target, Young House Love collection <-awesome blog, BTW)
Brackets ~$15 (Restore!)
Shelf and table surface: $30
Screws: $2.50
Everything else: Scrap
Grand Total: $84.00
Time: 8 hours
Parts list (adjust to how you want to make your own!):
Door
2 banister spindles for legs
2 shelf brackets
3 cabinet knobs
4 decorative knobs
1x3 lumber (~12 feet)
Trim/molding (~8 feet)
7 machine screws (no 8, 2" long)
14 washers to fit screws above
Screws to fit brackets
1x6 lumber (bought 16 feet, used slightly over 12 feet)
1x10 lumber (bought 6 feet, used slightly over 3 feet)
Paint
wood glue
asst. tools
Hope you like it!
~Amy
Amy, this potting table is great! I love the items you put on it to decorate it, so quaint! :)
ReplyDeleteThanks so much, Hannah!
Delete