Tuesday, June 14, 2016

On the Deck: Plants Are a Must

As I introduced last week, after years of planning and construction (in 2 phases!), we are really excited to have a fully functional deck.  I don't have all of my "deck projects" finished, but it is at least at the point where I can sit out there and finally relax.  I thought I would spent a few blog posts going through the projects I have finished, so this is the first installment of my mini-series: "on the deck".  I know, engineers really are the most creative people out there.  If you need someone to concisely state the obvious, I'm totally your girl.

This post is dedicated to the plant life that calls my new deck home, starting with this cute little corner:


To help you get your bearings, the corner is located here, by the orange arrow:


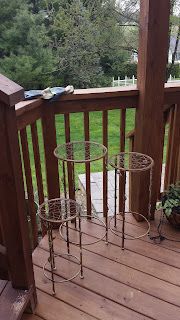
This spot is too small to hold much furniture (picture the traffic flow from the top deck to the backyard), so I decided on a grouping of potted plants instead.  To raise the pots off the deck floor, I went on the hunt for plant stands.  After some searching at Home Depot without much luck, I found three matching plant stands at Home Goods in 3 different sizes (I think they were something like $10, $15, and $20).  The only problem was, they were in a oil-rubbed white color, which looked like this on my deck:


You might be thinking to yourself, "umm, Amy, nice job on the photography, I can't even see those."  But that's the point.  I think they were going for an aged finish, but on my deck, they just looked dirty and sort of invisible.  A can of spray paint fixed the issue, and tied them in with the rest of the deck decor in a dark teal color (specifically, Rustoleum's Dark Turquoise):

  
I think this looks much better!  Getting three stands in varying heights adds some visual interest, but making them all the same, solid color makes them unified and not too distracting from the main feature: the plants themselves.  You could use the same idea with stands that didn't match - a can of spray paint can work wonders!


If you look the other direction on the deck, you'll see that the plant collection doesn't stop in this corner...


On the left, I have a large pot welcoming you as you make your way up the stairs from the yard.  The plant choices turned out to be a little wacky in this pot, but oh well:


Next are two hanging baskets that were a birthday gift from my parents, one of which became a home to a mama mourning dove.  She just showed up one day with her eggs, and squawked at me until the babies flew the next.  


Next is a pot of yummy herbs:


Then a pretty blue glazed pot with all sorts of things in it:


The fuchsia might be my favorite, but the variegated petunia is a close second. 


There are a couple scattered small pots in there too (really, is it possible to have too many plants?).  I plant to take some detailed notes/photos of what is in each pot, so I may share those in the future.  

You may also notice that I have a color theme going, and all of these pots are varying shades of blue, with a few white/black thrown in.  I think it helps to keep some balance (i.e. all in the same color family), especially because I wanted to mix up the plants I chose for each pot.

To sum up this post, consider gathering pots together for added visual effect, and also consider varying the height to make each pot's flowers stand out on their own.  Don't be afraid to make something work better for you, like spray painting plant stands.  Just be sure that you really want it before you lose your ability to return it. :)  When you are trying to decide what to plant where, keep in mind your light conditions (part shade for the most part on my deck), and your willingness to water pots.  All of my pots are fairly deep for their size, and I use MiracleGro Moisture Control (I think it just has extra perlite in the mix?) in these to help retain moisture.  I'll still end up watering them most nights once it gets to the hottest days of the summer.

I think that's enough plant life for one post!  Hope you are enjoying your backyard during these long days!  I know I am!

~Amy


Sunday, June 12, 2016

A Solution to a Tiny Garage

Hi Friends!

Ok, this post doesn't have any inspiring DIY projects, or great before and after photos, but it does have some practical, reality-of-not-living-in-a-mansion thoughts about how to make our house work for us.  Maybe a few of you out there can relate?

I may have mentioned before that our home has a small one car garage.   As in, pretty much fits the lawn mower and Christmas decorations, small.  I constantly find myself navigating the balance between my desire to not collect stuff that I don't need (i.e., lets not fill this house to the brim before we add kids to this situation!), and being able to organize and get to the stuff I need.  

I would show you a picture of what our garage looked like, but honestly, i can't shame myself that much on the internet.  Just know that it was full, and ugly.  I started thinking about the possibility of adding a shed to our backyard, mainly to house the lawn mower and other lawn tools, but hesitated because, well, sheds aren't exactly cheap.  One day I was walking through the neighborhood, and it dawned on me that all of our neighbors have similarly sized houses and we were the only ones without a shed.  So, a shed seemed much more justified, and necessary, once i realized that everyone else was in the same boat.

Our next decision was whether to buy or DIY.  I have explained my thought process with decisions like this before (like here), but basically it's a matter of whether we have the skill set to take on the project, and from there it's cost vs. time.  I felt like we have the skill set at this point to build a shed, maybe with a little help in a few critical areas.  However given my long list for the summer, and the fact that I wanted the shed to be in place sooner rather than later, we ultimately chose to buy the shed.  There is a place down the street which builds them, so delivery was easy, and their sheds are of good quality.  It did end up costing more, maybe 25% more than if we had built it ourselves?

Side note: working with an Amish outfit turned out to be a really entertaining way to go, and the amount of options for this shed were pretty impressive.  Sad to say we passed on the rooster cupola...

Friday was delivery day, and I was home to watch the action...


And here it is on its new pad in the backyard:


I at least got a start on moving things out of the garage/organizing (exciting only for me, I know):

\

Maybe once we get everything in, I'll do a post about what we were able to fit with the size shed we purchased... you know, if you can handle the excitement of another shed post!

If you don't have a shed builder within walking distance of your house (although I think the one near me delivered within 25 miles for free), I did see some kit options through the major home improvement stores that might be a good compromise between full DIY and having someone build for you.  You lose some customization options, but it seems fairly straightforward.

Also, if you are planning for a shed, make sure you check with your township for if/where one can be placed in your yard, and if the work requires a permit (ours did).  

Now that we have this shed, there's a chance i could park my car in the garage in the winter.... what a luxury! ;)

Have a great week out there!
~Amy

Wednesday, June 8, 2016

Deck - Part II

OK friends, this one is big.  At least to me.  We can finally call our deck, at least the structure, finished.  *Sigh of relief*

In case you haven't been following along, here is what we started with:

Old, worn out, and in some cases improperly built.  Back in 2014 we tackled the "top deck", which comes off of the dining room.  You can read about that here.  Here's what it looked like by the end of 2014:


And here's where we are today:


The construction was finished up around Thanksgiving last year, and I was finally able to stain it in the late spring.  You can see that we went with the same herringbone pattern for the decking (centered at the door) as the top deck.  There are steps to the back yard, and then steps to the patio we built underneath the top deck.


I started out thinking that I wanted a full roof on this side, but after weighing all of the options, we landed on a pergola.  I hung shade cloth to help it feel a little more like a room (post coming soon!), which has become a good alternative.


I'll go through all of the projects for filling the space in later posts, but for now I just wanted to share our new space.  It looks cozy at night too:


I got really excited before I stained the deck and actually drug everything out, just to see how it would look:


It was a lot of work, and there is still some more to be done, but the deck itself is finally open for business! :)  We are so happy with how it turned out, and it really gives us options for entertaining that we just can't do inside the house.  Our house isn't big enough for a crowd, but this deck opens up so many possibilities!  Aside from entertaining potential, we eat many of our meals at our table on the top deck, and find ourselves just resting out here in the evenings.  

If you live in the local area, and are thinking about revamping your outdoor space, consider Huber Landscaping and Excavating (http://www.huberle.com/) for your project!  This is a great example of the work he does!

Stay tuned for more posts about the details!

Take it easy,
Amy